Hello everyone, welcome back.
In today's post we will be replicating Obito Uchiha’s so broken mangekyo ability, Kamui! For this I will be using Godot 4.1 and a visual shader addon Shader-lib.
Effect breakdown!
Let’s break down the effect, first we will create a quad in front of our object. Then we will project what’s behind onto the quad then we will add some texture for dramatic effect then we will distort our quads UV. Finally we will scale our quad and object simultaneously.
Creating kamui quad
Ok now let’s create a quad in our scene so add child, MeshInstance3D. Select new quad mesh, I will call our node kamui. Now let’s create a visual shader, I will call it kamui_shader. Let’s also create a new shader material, I will call it kamui and I like to keep the extension .material.
Let’s assign our shader to our material. In the Flags, make sure to check Unshaded. We don’t want it to interact with lights. and assign our material to our quad.
In our visual shader, first we want to project what is behind, on the quad itself. So create a Texture2D node, select Screen. It will give us the screen texture. Then take it’s color and feed it into the Albedo.
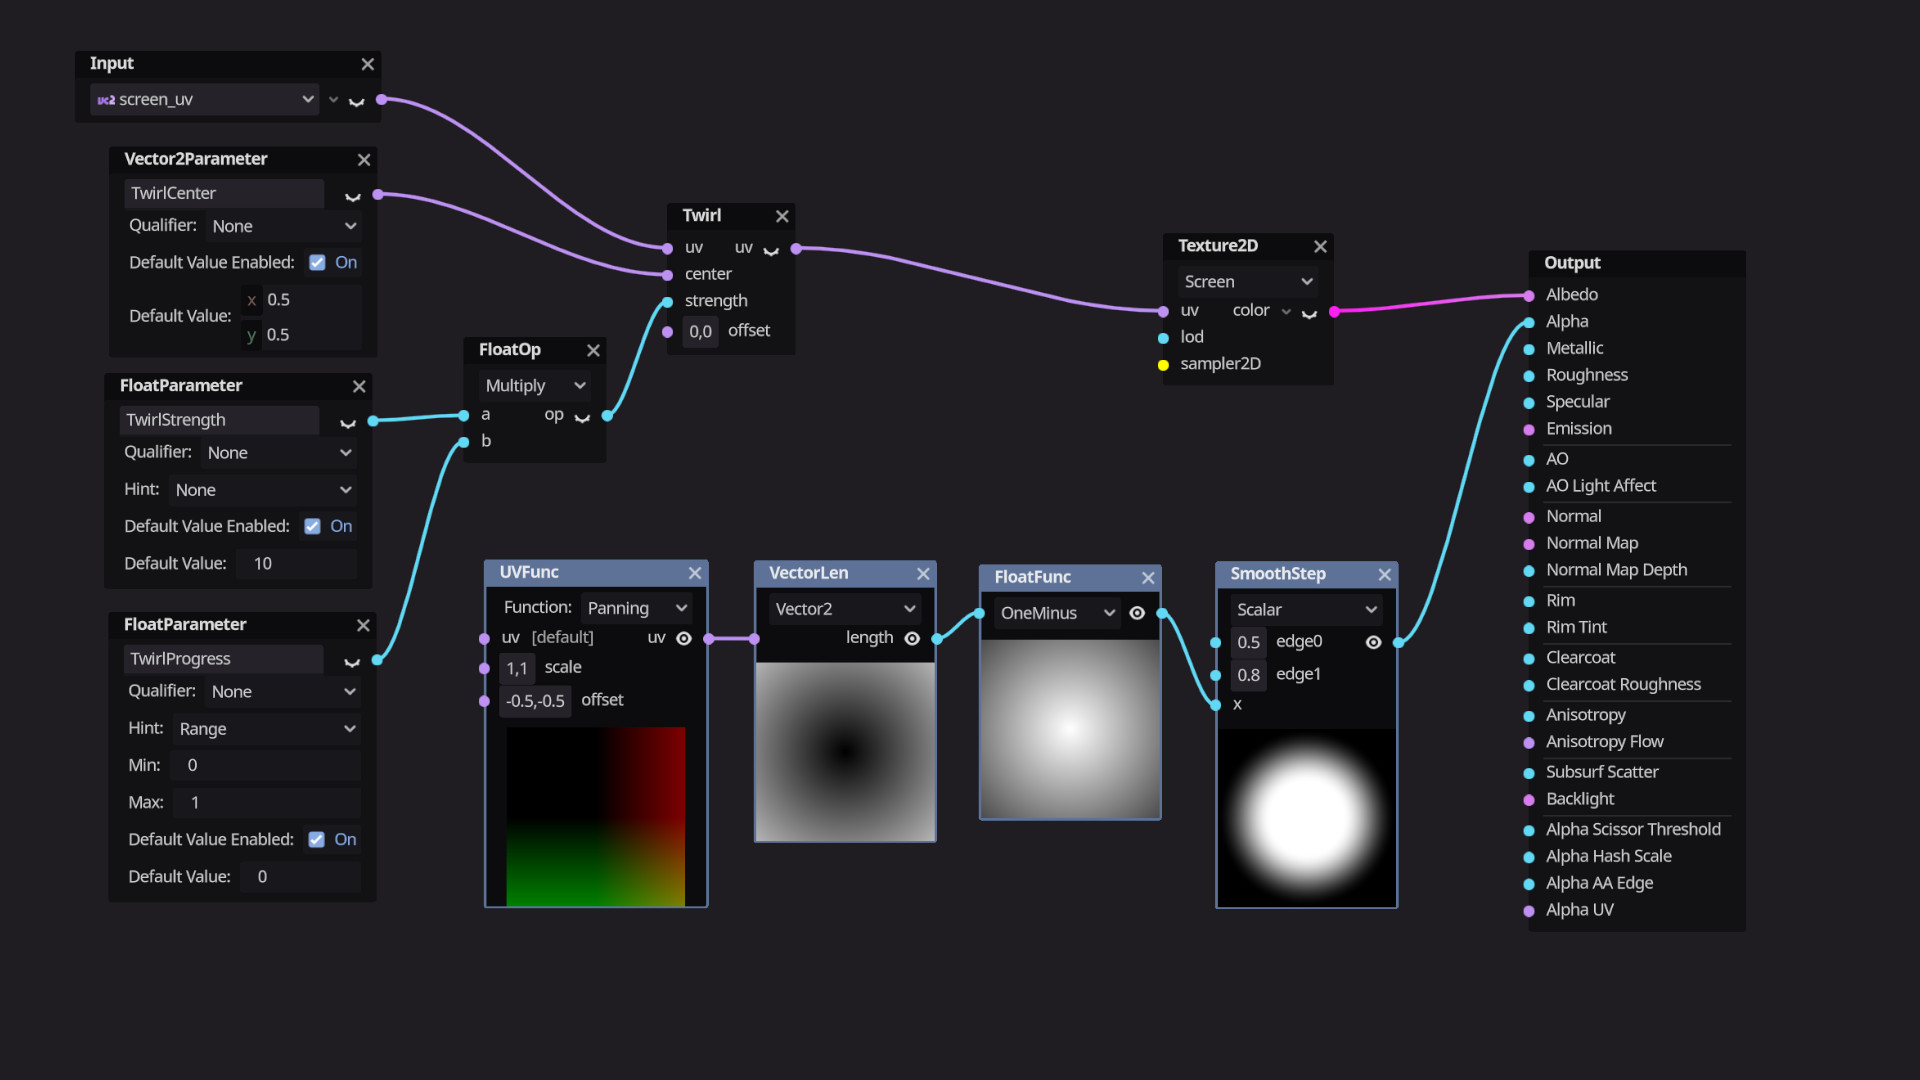
Now we want to distort the UVs so let’s create a Twirl node. It is the node from the addon, which will give us this nice effect. Now if I just set the Strength to 0 and feed the output in our screen texture’s UVs, notice that the quad no longer properly projects what is behind.
The reason is Twirl node uses the mesh UVs by default. So we will simply grab the screen_uv and feed it into Twirl node’s UVs.
Now we will feed the Strength from the inspector so, let’s create a FloatParameter, call it TwrilStrength and give default value of like 200.
Now we want to animate the effect so let’s create another FloatParameter, call it TwirlProgress, set Hint to Range from 0 to 1 and give default value of 0. Then we will multiply TwirlStrength with TwirlProgress and feed it into the Strength.
We need to calculate the center via code so for now let’s create a Vector2Parameter. Call it TwirlCenter, give default value of 0.5, 0.5 and feed it into center.
Now our quad will have hard edges when we will distort our UVs. So let’s create a UVFunc node with Function mode Panning. It will give us UVs which we can offset using this offset, set it to -0.5, -0.5. Then take its output and feed it into VectorLen node. It will give us the length of a vector.
Then take its output and feed it into One minus node. One minus as the name suggest subtract whatever value we feed in from 1. In our case it will invert the white color to black and black to white.
Now let’s create a SmoothStep node, set the edge0 to 0.5, edge1 to 0.8, and feed our One minus output in x. SmoothStep node will return 0 if the value of x is less than edge0, return 1 if the value of x is greater than edge1 and for values that lies between edge0 and edge1 it will return the result of Hermite interpolation which will be between 0 and 1. Then we will take its output and feed it into alpha.
Now let’s add the texture on top, for that let’s create UVPolarCoords node. Polar coordinate are circular coordinate where X goes outward and Y goes around. Let’s split its output using Vector2Decompose node.
We want Y values so take its output and feed it into TriangleWave node. It is another nice node from the addon, which will return tringular waves with values between -1 and 1. In UVPolarCoords set the Repeat value to 10, it will give us this nice triangular waves with 10 teeth.
Well actually it is 20, because other 10 are in negative numbers so we can’t see it in preview. We don’t want them so let’s clamp this using Clamp node. We will clamp the values between 0 and 0.7 because I want the texture to be a bit transparent.
Then take its output and feed it into Pow node. Power node will darken values which are less than 1 as we increase the power. Set the power to 10.
Now let’s shear our waves a bit and for that create RadialShear node. Another nice node from the addon which will provide the warping effect on UVs. Take its output and feed it into UVPolarCoords node’s UVs.
Let’s also rotate our waves and for that let’s create Rotate node. Another node from the addon which will rotate the UVs. We will rotate UVs over time so let’s grab Time. And feed it into Rotation. Then take Rotate node’s output and feed it into RadialShear node’s UVs.
Finally let’s distort our waves a bit so create a SimpleNoise node. This node is also from the addon which will give us nice value noise. Alternatively we can use Texture2D with noise texture as well. We will mix Simple noise with our polar coordinates.
So let’s create a Mix node for Vector2. Mix node basically interpolates input a and b based on weight. Feed Polar coordinates into a, noise into b. Now it doesn’t matter what we feed in x for weight but for y feed 0.5. Take our Mix nodes output and feed it into VectorDecompose node.
Now we will add this distorted waves on top of our screen texture with Add node for Vector3. Then take our addition and feed it into Albedo. That’s it for our Fragment processor, It will look like this.
Now let’s head over to Vertex processor.
Create GetBillboardMatrix node. keep Billboard Type to Enable then check Keep scale. Take its output and feed it into Model View Matrix.
We have made our kamui into bill board so it doesn’t mater from which angle we look at it, it will always face the camera and that’s it for our shader.
Defining the behaviour via GDScripts
Now we want to define the behaviour for our effect, I want to create a quad when I click on any object and then make the object disappear along with the effect and for that we need to create scripts.
First let’s create a script called Kamui which extends from Node3D. Then let’s assign it to our Kamui node. Shocker!
Kamui.gd
- class_name Kamui extends Node3D
- var material: ShaderMaterial
- var kamui_caller: Kamuiable
- var effect_scale: Vector3
- var kamui_caller_scale: Vector3
- @export var scale_in_duration: float = 2.0
- @export var effect_duration: float = 3.0
- func _ready() -> void:
- material = self.material_override
- func scale_in() -> void:
- var scale_tween: Tween = create_tween()
- scale_tween.tween_method(update_scale, 0.0, 1.0, scale_in_duration).set_trans(Tween.TRANS_QUART)
- scale_tween.finished.connect(animate_progress)
- func update_scale(new_scale_value: float) -> void:
- var new_scale: Vector3 = effect_scale * new_scale_value
- scale = new_scale
- func animate_progress() -> void:
- var progress_tween: Tween = create_tween()
- progress_tween.tween_method(update_progress, 0.0, 1.0, effect_duration).set_trans(Tween.TRANS_LINEAR)
- progress_tween.finished.connect(on_animation_done)
- func update_progress(value: float) -> void:
- material.set_shader_parameter("TwirlProgress", value)
- var scale_value: float = 1.0 - value
- update_scale(scale_value)
- var new_kamuiable_scale: Vector3 = kamui_caller_scale * scale_value
- kamui_caller.scale = new_kamuiable_scale
- func on_animation_done() -> void:
- queue_free()
- kamui_caller.queue_free()
- func set_center(center: Vector2) -> void:
- material.set_shader_parameter("TwirlCenter", center)
- func set_kamui_caller(effect_caller: Kamuiable) -> void:
- kamui_caller = effect_caller
- kamui_caller_scale = kamui_caller.scale
Then let’s save our Kamui node as an instance scene or let’s say as a prefab. So Right click > Save branch as scene, and I will save it as Kamui.tscn.
Now let’s say we want to Kamui Sphere when we click on it. So let’s create an Area3D node. I will call it KamuiableSphere. Then add CollisionShape3D as a child and give new BoxShape3D. This is so that we can click on object.
Then for visuals let’s add MeshInstance3D as Child of our KamuiableSphere. Set the Mesh as Sphere. Let’s create another script, I will call it Kamuiable which extends from Node3D.
Assign it to our KamuiableSphere.
Kamuiable.gd
- class_name Kamuiable extends Node3D
- var is_pointer_on_node: bool = false
- @export var effect_distance: float = 0.5
- @export var effect_scale: Vector3 = Vector3.ONE
- @export var camera: Camera3D
- @export var kamui_effect: PackedScene
- func _process(_delta: float) -> void:
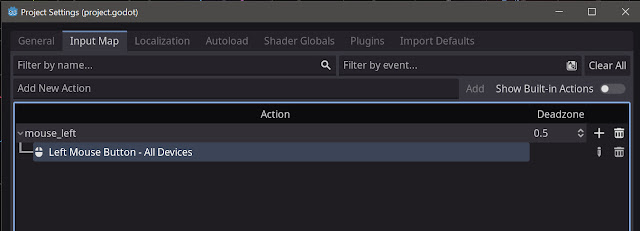
- if is_pointer_on_node && Input.is_action_just_pressed("mouse_left"):
- create_kamui()
- func create_kamui() -> void:
- var camera_direction: Vector3 = (camera.global_position - global_position).normalized()
- var new_position: Vector3 = (effect_distance * camera_direction) + global_position
- var kamui: Node3D = kamui_effect.instantiate()
- get_tree().root.get_node("Main").add_child(kamui)
- kamui.set_kamui_caller(self)
- kamui.effect_scale = effect_scale
- kamui.set_center(calculate_center())
- kamui.global_position = new_position
- kamui.scale_in()
- func calculate_center() -> Vector2:
- var screen_pos: Vector2 = camera.unproject_position(global_position)
- var screen_size: Vector2 = get_viewport().size
- var center: Vector2 = Vector2(screen_pos.x / screen_size.x, screen_pos.y / screen_size.y)
- return center
- func on_mouse_entered() -> void:
- is_pointer_on_node = true
- func on_mouse_exited() -> void:
- is_pointer_on_node = false
In the KamuiableSphere let’s assign the values and we have our effect.
One final thing. If we setup multiply kamuiables and create multiple effect at the same time, everything goes haywire. The reason is right now our code is updating the same material for all kamui quads. To fix this we will just go to our material and check this Local to scene.
It will create a new instance of our material for all quads which we will load to our scene and now everything will work.
Trouble following along? Check out this video!
Thank you so much for reading.


Comments
Post a Comment