Hello everyone, welcome back to the channel. Happy Diwali to everyone who celebrates, and what other good way it is than some fireworks.
So today’s post is about particles and we are going to create an easy fireworks effect in Godot and for this I am using Godot 4.2 beta. Well, technically it still can be created using stable 4.1 version, nothing complicated but I wanted to mess around with new things so I am using 4.2.

Okay so first things first, I have this WorldEnvironment node in my scene and the most important setting here is this Glow.

Rocket Particles
First, let’s add a particle node in our scene, We will use GPUParticles3D, because we are working in 3D.
And if you have seen that there is also CPUParicles3D node and why we are not using it? Well it was created to work on older devices without dedicate GPU support and they are getting deprecated so, you all should use GPU particles going forward.
Okay, I am going to call this node RocketParticles. We have this nice node but notice that we have a warning here and if we click on it, it will tell us why there are no particles on the screen. We are missing two things here, first is a draw pass, we haven’t tell Godot what to draw on screen.
So let’s go to Draw passes in the inspector and in pass 1 let’s assign a mesh to draw. Let’s select Ribbon Trail mesh, it is a 2D trail mesh. Once selected, if you click on it, we have options to adjust our mesh.
Now first, let’s create a material for our mesh, so create new resource, and select StandardMaterial3D. I will call it fireworks and I like to keep the extension .material.
Let’s configure our material, first we will go to Transparency section, set Transparency to Alpha, we want our material to be transparent. Blend mode to Add and Cull mode to Disable, we want to draw both front and back faces.
Then in Shading section, select the Shading mode to Unshaded, we don’t want it to interact with lights.
In Vertex color section, check Use as albedo, this one is important, because otherwise we can’t override the colors from our particle node and also check Is sRGB, because fireworks or let’s say sparks are glowing things and it renders best in sRGB color space.

In Albedo section, keep the Color white, for Texture, let’s select GradientTexture2D. It will give use this nice little gradient, let’s make it vertical. We can fine tune it in Fill section, select Fill mode to Radial. Check Use HDR, and flip the gradient. Then check Texture force to sRGB, again because glowing things, use HDR and sRGB.

Then we will go all the way down to Transform section and check Use Particle trails, this is important because otherwise we won’t be able to render the trails.

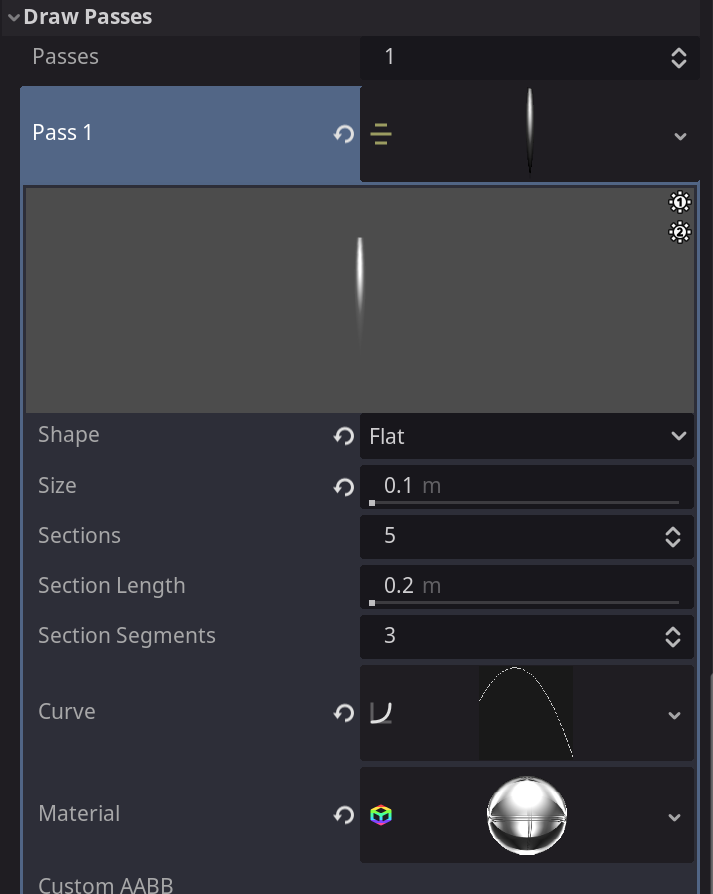
Now let’s go back to our particle node’s Ribbon mesh settings. Assign our newly created material, set the Shape to Flat and Size to 0.2m, and we will create a new Curve, to give it sort of upward fireball shape.
Now we have solve one warning for draw pass but one still remains about the Process material. Process material tells Godot that how we want to configure our particles, how to spawn them, update them etc. So in the Process material, select new ParticleProcessMaterial, and now our particles starts falling, it looks weird but the warnings are gone.
Now let’s go to Amount, this is the total amount of particles that our node is allowed to have, it won’t ever exceed this amount, let’s set it to 2.
In the Time section, let’s set the Lifetime to 4s. Lifetime is the duration each particle is allowed to be rendered. Then set Fixed FPS to 60.

Then we are not going to change anything in Drawing section, but visibility box is the box that is necessary for our camera to see otherwise our particles will not render. I am not going to touch this, but you will probably have to depending on your scene.
Then in the Trails section, I will enable to trails. and this Lifetime is the trails length, set it to 0.5s and now our particles starts to make sense.

Now let’s go to Process material, first set the Lifetime randomness to 0.3, this means that we want to add 30 % variation to our lifetime. We have set the lifetime 4 seconds so 0.3 means our particles life time will vary between 2.8 and 4 seconds.
Then let’s head over to Spawn section, set the Emission shape to Box, and I want to have a big box on X Axis so will set 100 on X. So basically our particles will spawn within this defined box.
In the Velocity, we will set the direction to up. Set the Spread to 0 degrees, just follow this direction don’t spread and set the Initial velocity between 25 and 30.

Okay, let’s head over to Display, we will set the Scale between 1 and 2, so our particles will have different scale.
Now in the Color curves, we can override the colors. In the Color ramp let’s add a new gradient like this. This is basically color over life time, so we will start full opaque and then slowly fades out.
For Color inital ramp, add another gradient, this will be the random color pallet for our particles.

Blast particles
Now, apart from simple effects, most effects in games are combination of multiple particle systems. So, we will create another particle node for blast effect, and will emit them when our rocket particle dies. So let’s hide this one and create another GPUParticles3D node. I will call it, BlastParticles, We will do the same thing as before, draw pass, add ribbon trail mesh.
Shape flat, size 0.1m, assign our fireworks.material, and set the curve like this.
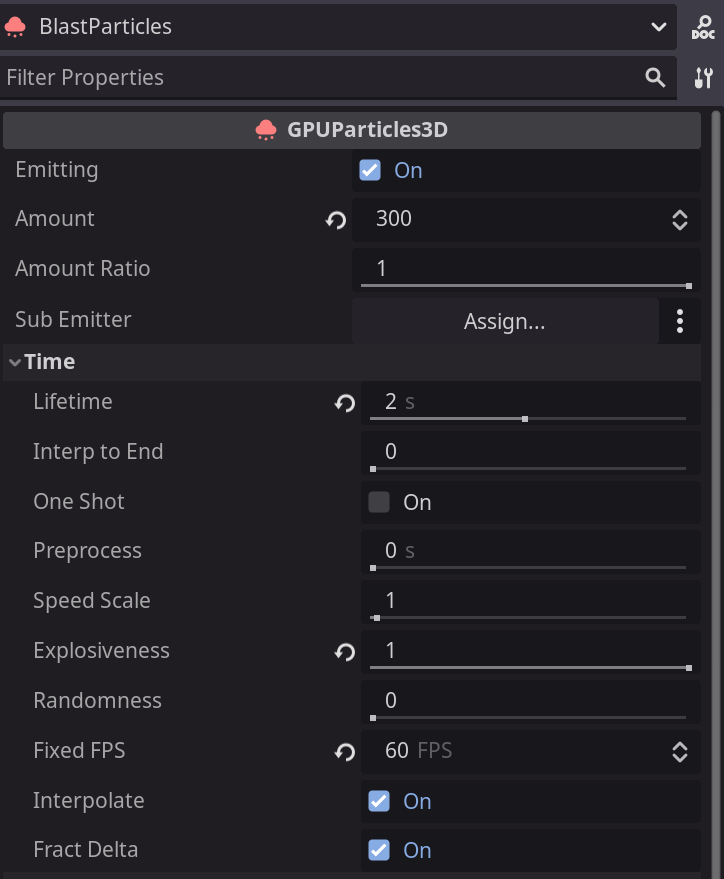
Set the Amount to 300.
In Time section set the Lifetime to 2s, set the Explosiveness to 1, Explosiveness is pretty self explanatory, if it is set to 0, particles will emit continuously, 1 means emit all 30 particles at once. Then set Fixed FPS to 60.
Enable trails, set the lifetime to 0.6s.

Create new ParticleProcessMaterial. In Process material, set the Lifetime Randomness to 0.8.
In Spawn section, we will set the Velocity direction to up (0, 1, 0), Spread to 180 degrees and Initial Velocity between 15 and 20.

Let’s go to Display section, set the Scale between 4 and 6.
In Color curves, we want to fade our particles so set the Color ramp we will add the gradient which goes from white to black.
We want random color between red and yellow so let’s do that in Color Initial Ramp.
In Hue variation let’s a variation between -0.1 and 0.2, It will randomly shift the hues of our particles between these values.

And our blast effect is done, but we want to emit them when our RocketParticles die so let’s select RocketParticles, In Sub emitter slot we will assign our BlastParticles.

Finally in Process material, go to Sub emitter section, set the Mode to At end, basically we are telling Godot to emit our blast particles when our individual rocket particle dies.
Then this Amount at end is how many we want to emit, let’s set it to 32, it is the max value.

Pretty cool, finally let’s add the sparks particles that emit with our BlastParticles.
Sparks particles
Let’s create another GPUParticles3D node, I will call it SparksParticle.
Let’s also create a new material for our sparks, I will duplicate the fireworks.material and call it sparks.material. Only thing we want to change in sparks.material, is in the Albedo section, we want to flip the gradient texture.
Here, whenever you duplicate something, one thing to keep in mind is, in Godot resources are shared. So the gradient texture is a resource so if I would change it, it will reflect in fireworks.material as well.
So to fix it you need to right click and select Make unique option.

For our SparksParticles, let’s add a Draw pass, this time with TubeTrailMesh, it is basically 3D trail, I am using it because it looks better for sparks effect. Set the Radius to 0.2m.
On thing to keep in mind is we will emit 3D mesh here so we will reduce the Radial steps to 3 to cut down the vertices. Then let’s assign our new sparks.material.

Set the Amount to higher value this time so 1000. Set the Lifetime to 0.3s. Randomness to 1 randomise the spawn rate, and Fixed FPS to 60.

Let’s enable the trails and set the Lifetime to 0.3s.

Now let’s add new ParticleProcessmaterial. In the Process Material, set the Lifetime Randomness to 0.9.
In Spawn section, set Velocity Direction to down(0 , -1, 0), Spread to 90 degrees, Initial Velocity between -20 and 20.

In Display section, set the Scale between 0.5 and 1.
In Color curves set the Color Ramp to White to Dark grey gradient, Color Inital Ramp to Orange to Yellow gradient.

Finally, select our BlastParticles, in Sub emitter slot assign our SparksParticles.

In Process material, go to Sub emitter section, Set the Mode to Constant, constantly spawn particles, and Frequency to 20Hz. Essentially it means spawn 20 particles per second.

And finally we have our fireworks effect.
Trouble following along? Check out this step by step tutorial!
Thank you so much for reading.
Comments
Post a Comment