Hello everyone, welcome back.
Today, we will create one of the iconic jutsu from Naruto anime and the person I am talking about is none other than Kakashi Hatake!
We will create his signature move "Lightning blade" using shader graph.

Intro
For this I am using Unity version 2023.1, but it will work on any LTS version. I have a project setup in URP, I also have the Post processing volume with main modules of Bloom and Tone mapping with the mode ACES.
We can break down this effect in 2 parts, first the lightning and second the core. We will use 2 separate shader graphs to create them.
The Core
First, let's start with the easy part the core. Let's create an Unlit shader graph. Call it LightningBladeCoreShader.
In shader graph, go to Graph inspector, in the graph settings, set the Surface type to Transparent.
For the core we will use Unity's default particle texture, so let's directly create Sample texture 2D node. In the texture slot select the default particle texture, then take its output and feed it into Power node.
Power node will darken the values which are less than 1 as we increase the power. We will control the power from the inspector, so let's create a float property, call it CorePower, give default value of 2. Drag it in and feed it into the Power node.
Now let's duplicate Sample Texture 2D and Power nodes, take another output from our CorePower and feed it into Divide node. We will divide it with 0.5, then take its output and feed it into our new Power node.

Now we have these 2 particle texture one big and one small, we will distort the big one.
To do that, let's create Simple noise node. Set its scale to 50, Now let's create a Lerp node. Lerp stands for linear interpolation.
Let's take our Simple noise node's output and feed it into Input B. In Input A we will keep original UVs so create UV node, take its output and feed it into Input A.
We will control this T from the inspector, so let's create a float property. Call it DistortionScale, give default value of 0.1, set the Mode to Slider which goes from 0 to 1. Drag it in and feed it into T.
Take our Lerp node's output and feed it into Sample texture 2D node's UV.
Now we will scroll our noise over time, so let's create a Tililng and offset node, and feed its output into Simple noise node's UV.

Create a Time node, take our Time and feed it into Multiply node to control the scroll speed. We will control the speed from the inspector so let's create a Vector2 property. Call it PanSpeed, give default value of -2, 2, Drag it in and feed it into Multiply node then take Multiply node's output and feed it into Tiling and offset node's UV.
Now we have our distorted particle texture, however I want the spikey distortion and for that let's create Polar coordinates node.
Let's take our Polar coordinates node's output and feed it into Absolute node. Absolute node will convert every values into absolute values or unsigned values or positive values. Then take its output and split it using Split node.
Now if we feed X into the UV we will get ripple effect, we want spikes so let's feed Y instead of X.

Then we will add 2 Power nodes together, then take Add node's output and feed it into Alpha block.
Let's create a color property, call it BaseColor, Set the mode HDR, Give default blueish color and drag it in. Now we will multiply our BaseColor with Add node. Finally take its output and feed it into BaseColor block.
We will apply the material on our Quad so it will just be a 2D effect, so I am going to use this billboard sub graph.

In our shader graph, let's drag the billboard sub graph, take its output and feed it into Vertex context's Position block.
Our core shader will look something like this at the end.

Now let's move on to the lightning bolt part.
The lightning bolts
Again we will use another shader graph for that so, create an Unlit shader graph. Let's call it LightningBladeBoltShader.
In shader graph, go to Graph inspector, in the graph settings, set the Surface type to Transparent.
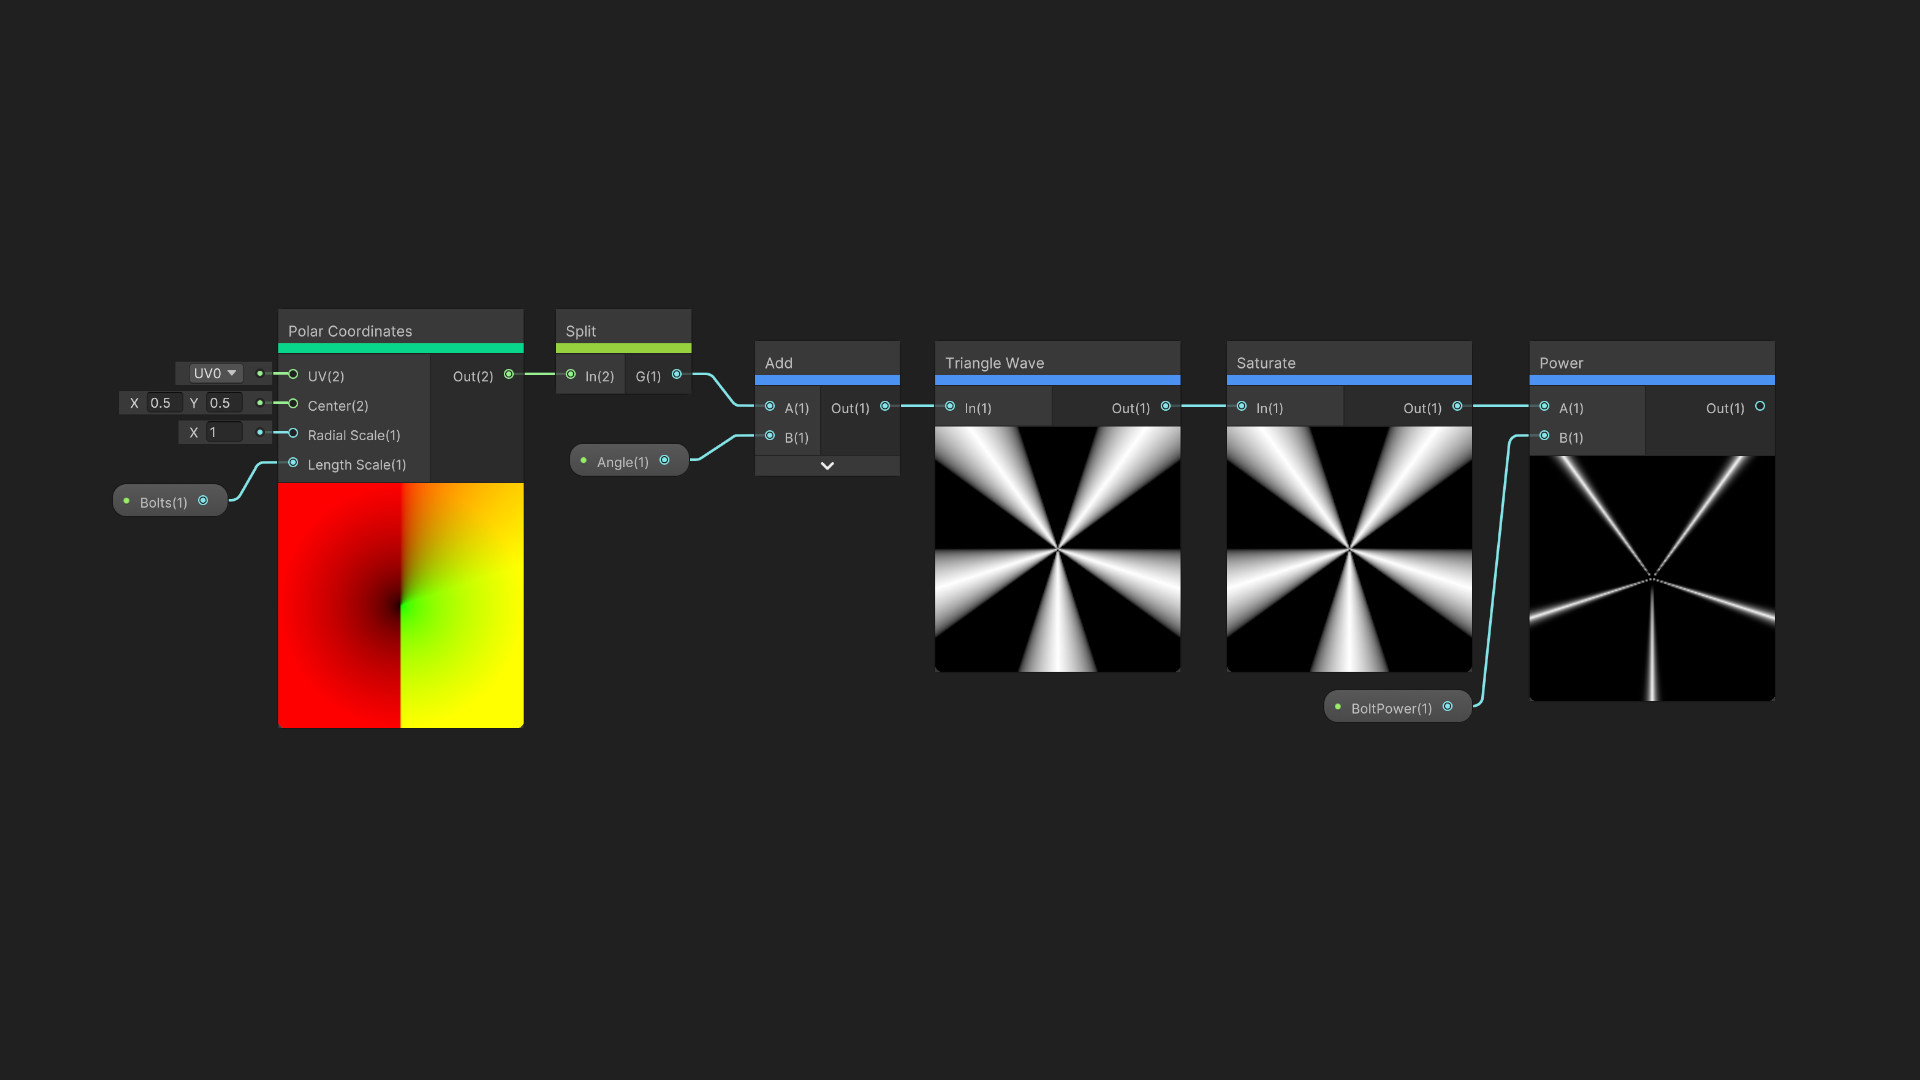
To create lightning bolts we will use triangle wave, they are similar to sine waves but their shape is triangular. For that let's create a Triangle wave node.
Now we want our bolts to go outward from the center, for that let's create Polar coordinates node. Take its output and feed it into Split node. Now we can control the number of bolts with the LengthScale. We will control it from the Inspector so let's create a float property, call it Bolts, give default value of 5, drag it in and feed it into LengthScale.
I will also like to have an ability to rotate these bolts, and we can easily rotate them by adding some offset to our Y. We will do that from inspector so let's create another float property, call it Angle, drag it in and feed it into Add node.
Now to control the width of our bolts we can use Power node, but if we directly feed our waves to Power node, we will get NaN or Not a number error where the values are less then 0. So to fix it we will use Saturate node. It will clamp the values between 0 and 1. Then take its output and feed it into Power node.
Now we can control the width. We will do that from the Inspector so let's create a float property, call it BoltPower, give default value of 20, drag it in and feed it into Power node.
We will fade the bolts from the edges, and for that let's create another Polar coordingates node. Take its output and feed it into Split node.
We will use the X, it will have value of 0 at the center and it increases as we move outward, we want opposite of that so we will take our X and feed it into One minus node.
Now we have this nice circle, we will control its size with Power node but first we will saturate it for similar to avoid NaN error. Then we will multiply both Power nodes together.
Let's also create a color property, call it BaseColor, Set the mode HDR, give default color and drag it in. We will multiply our BaseColor with our bolts, then take Multiply node's output and feed it into BaseColor block.
Also take the previous Multiply node's output and feed it into the Alpha block.

Now let's distort our bolts, we will use simple noise for that just as we did for our core part.

We will also scroll this noise over time, so again similar to what we have done earlier in core part.

And now our bolts look like lightning bolts, now for the edge blend, I want it to ping pong between 2 values over time.
For that we will create 2 properties, first float property to determine how quickly it ping pong between two values, I will call it EdgeBlendSpeed. Give default value of 2 and drag it in.
Second Vector2 property, to detemine the min max range, I will call it EdgeMinMax, give default value of 2, 5 and drag it in.
Now we will multiply our EdgeBlendSpeed with Time then take its output and feed it into Sine node. Its output values will ping pong between -1 and 1. We will remap them so take its output and feed it into Remap node.
Remap node as the name implies remaps the values which has original range from -1 to 1, and we will remap them with our EdgeMinMax.
Finally take its output and feed it into Power node. We will also use our billboard sub graph so our effect will always face towards the camera.
That's it for our bolt shader, it will look like this at the end.

Now it looks pretty cool but I want to change the number of bolts and its rotation after fixed duration of time.
Changing bolt numbers and rotation
Let's create a simple script, Let's call it LightningBoltSettings, and assign it to our LightningBlade gameobject.
using UnityEngine;

public class LightningBoltSettings : MonoBehaviour
{
   [SerializeField] private int minBolts = 3;
   [SerializeField] private int maxBolts = 7;
   [SerializeField] private float changeDuration = 0.1f;

   [SerializeField] private Material material;

   private void Awake() {
      InvokeRepeating(nameof(ChangeStrips), changeDuration, changeDuration);
   }

   private void ChangeStrips() {
      int bolts = Random.Range(minBolts, maxBolts);
      float angle = Random.Range(0, Mathf.PI);

      material.SetFloat("_Bolts", bolts);
      material.SetFloat("_Angle", angle);
   }

}
Then in the inspector let's assign our material into material slot.
So we will change bolt count randomly between 3 and 7 with random rotation after every tenth of a second.
And that's it. We have our lightning blade effect.
Trouble following along? Check out this video!
Thank you so much for reading!
Comments
Post a Comment